This guide gives you details about dishwasher drains and double sinks. The main function of a double sink is washing dishes although they are increasingly getting versatile with more aesthetics.
Therefore, it needs to be connected properly to a dishwasher drain. The dishwasher drain serves as a means for transferring the dirty water into the drainage. If the connection isn’t done correctly, you could have overflowing dirty water that is guaranteed to mess up the entire kitchen.
You really do not want that to happen, right? Yes. And since you have to supply water to the sink, a dishwasher drain is just one of the most essentials.
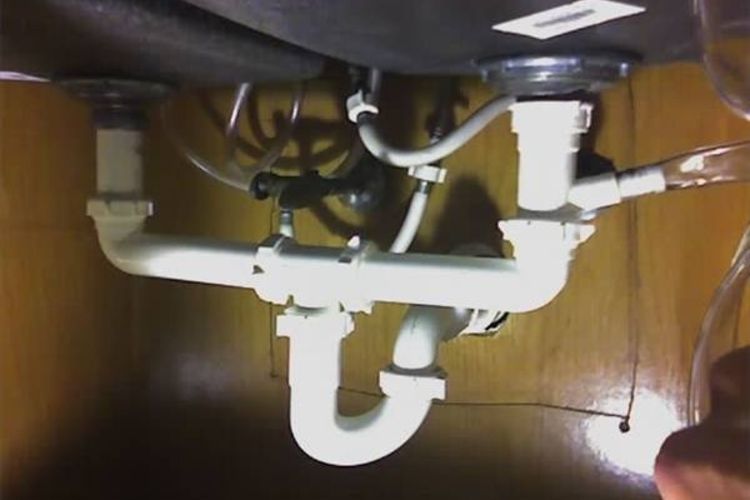
Connecting dishwasher drain to double sink requires that you’re aware of the type of installation in place. It could either come with garbage disposal or without. If the double sink has garbage disposal attached to it, it should have a connection for draining the dishwasher. This is known as the drain line. Else, the double sink has to be manually connected to the drain line.
If you enjoy doing things yourself like me, you may be wondering how to install dishwasher drain to double sink. The good news is there is no need to replace the entire drain system. Instead, you can choose a drain specifically designed for your sink and the process is outlined below.
Step by step guide on how to install dish drainer to a double sink
Connecting dishwasher drain to double sink can be quite straightforward if you pay proper attention to the necessary steps. This article is going to explain the necessary steps you should follow while installing a dish drainer to a double sink.
Tools Required
Before we jump into it, here is the shortlist of tools you will need to carry out the task.
- Measuring tape
- Hacksaw or tubbing cutter
- Sandpaper
- Joint washer
- Plier
- Marker
- Screwdrivers
- Hammer
Step 1: Turn off the water supply
You do not want water disturbance while you’re working on the drain line. Hence, ensure you perform the task at a time you won’t need to use the sink. This prevents any need of turning on the faucet which could create a mess while you’re on the job.
Step 2: Remove slip nuts and place the drain tailpiece properly
Under the sink, you will locate a slip nut that connects your drain basket to the drain tailpiece. You simply have to loosen this slip nut using a plier and let it roll down through the tailpiece. Now, remove the drain tailpiece and take it apart from the basket.
Locate the other slip nuts below the tailpiece and use the plier to loosen them. Now you can raise the original tailpiece that is holding both sink drains together. There is a slip nut keeping the tailpiece and the drain basket together. Remove this but leave the tailpiece and the drain in place for now.
Step 3: Measure the tailpiece and cut out
Get the length of the drain tailpiece on the original sink using a measuring tape. Using a PVC wye tailpiece, get the measurement. Use a hacksaw to cut out the bottom end of the new tailpiece. Then, smoothen out the edged you have cut with 320-grit sandpaper.
Step 4: Connect the cut tailpiece and tighten
Now, you can remove the joint washer from the connected drain line in step 2 above. Replace with a joint washer. Connect the end of the tailpiece you have cut earlier with the slip nut for the drain line. Using the pliers, fasten the nut tightly.
Step 5: Connect the dishwasher top to the drain basket
You should notice a fresh slip nut and washer on the wye. Connect this to the drain basket. Slide up the nut and washer. Then, connect those to the basket by twisting in the clockwise direction. Use pliers to fasten the nut tight.
Step 6: Connect the drain hose to the drain line
Draw the drain hose to the drain line. Then, take it over the pipe coming out of the dishwasher tailpiece. Tighten the hose to the drain line using the screw that comes with it.
Step 7: Turn on the water supply
Go over the process again to inspect the connections. This is crucial to prevent any leakage or bad connection. Then, turn on the water supply you shut off before starting. If you find any other connection problem, fix it immediately before it worsens.
How to Install Dual Kitchen Sink Drain Plumbing Pipes
When installing or replacing a kitchen sink, you will need to use a new draining pipe.This is because the old ones will be damaged during the initial process of taking them apart. Below are the steps you need to follow when installing a dual kitchen sink drain pipe.
- Attach the sink drain to the existing drain in the wall. Use your marker to mark where the center of your T-fitting will connect to the drainpipe in the wall.
- Cut out a 12 inches pipe at the top. This is to ensure that you appropriately have your T-fittings correctly connected to the sewer pipe.
- Glue the pieces of the PVC to the top and bottom of the T-fitting.
- Use a P-trap compression nut to tighten the drain outlet pipe to attach a dishwasher drain hose with a double bowl sink.
- Glue the T-fitting using a suitable measurement into the upward pointed outlet.
- Cut additional 11/2-inch diameter pipe to reach the outlet of the p-trap
- On the cemented portion glue, a thread trap adapter fitting
- Tighten all compression nuts, then use water-pump pliers to turn them furthermore.
Conclusion
You can fix your kitchen sink yourself without going through the stress of searching around for a plumber. During the installation of a double bowl sink drain with dishwasher, follow the steps above and avoid cutting corners. Else, you risk flooding your home.
Connecting the double kitchen sink plumbing with dishwasher could be very easy and accessible without having a formal skill about the exercise. The process requires a lot of patience. However, it is nothing you can’t get done in time for your next kitchen use.


